Composite Pattern
데코레이터(Decorator) 패턴
데코레이터 패턴은 기존 코드를 변경하지 않고도 부가 기능을 추가 하는 패턴이다.
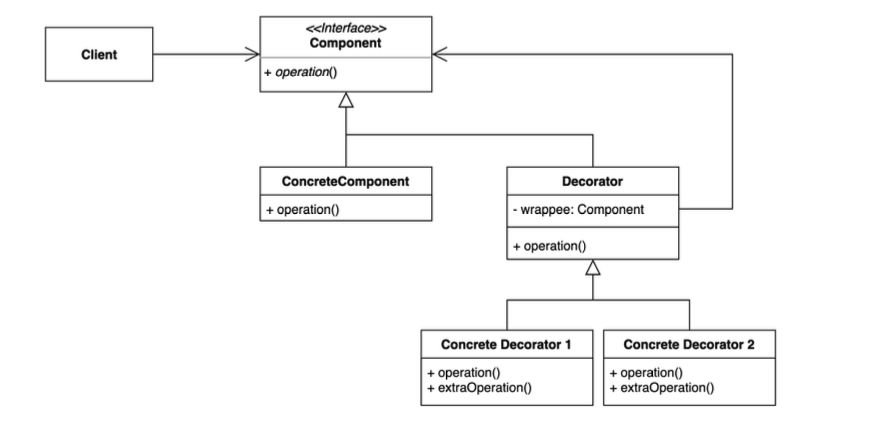
데코레이터 패턴 구조
- Component : 기존 기능을 뜻하는 인터페이스를 정의한다.
- ConcreteComponent : 기존 기능을 구현하는 어떤 한 클래스
- Decorator : 기존 기능에 추가할 부가 기능을 뜻하는 인터페이스를 정의한다. 이 인터페이스는 Component에서 정의한 interface를 그대로 정의한다.
- ConcreteDecorator : 추가할 부가 기능을 구현하는 클래스
핵심은 Decorator가 Component의 인터페이스를 그대로 구현하고 있기 때문에 클라이언트는 ConcreteComponent와 ConcreteDecorator를 구분하지 않고 사용할 수 있다.
ConcreteDecorator는 Component를 가지고 있기 때문에 기존 operation을 호출하고 추가적인 부가 기능을 수행할 수 있다.
패턴 적용 전
커피 가게에서 커피 주문을 할 수 있고, 거기에 토핑을 추가하는 기능을 구현해보자.
기본 커피, 밀크 커피, 설탕과 밀크 커피를 구현해보자.
1
2
3
4
5
6
7
8
9
10
11
12
13
14
15
16
17
18
19
20
21
22
23
24
25
26
27
28
29
30
class Coffee{
  fun cost():Int{
    return 1000
  }
}

class MilkCoffee{
  fun cost():Int{
    return 1500
  }
}

class SugarMilkCoffee{
  fun cost():Int{
    return 2000
  }
}


fun main(){
  val coffee = Coffee()
  val milkCoffee = MilkCoffee()
  val sugarMilkCoffee = SugarMilkCoffee()

  println(coffee.cost())
  println(milkCoffee.cost())
  println(sugarMilkCoffee.cost())

}
위 예제에서는 각 경우의 수마다 새로운 클래스를 만들어야 한다. 이는 토핑 추가 때마다 새로운 클래스를 만들어야하고 조합이 많아질수록 클래스의 수가 기하급수적으로 증가할 수 있다.
이제 데코레이터 패턴을 적용하여 토핑을 추가하는 기능을 구현해보자.
패턴 적용 후
Coffee 인터페이스를 만들고, 기본 커피를 구현하는 클래스를 만든다.
이 후 Decorator 인터페이스를 만들고, Decorator 인터페이스를 구현하는 클래스를 만든다. 이 때 Decorator 클래스는 Coffee 인터페이스를 가지고 있어야 한다.
기존에 각 토핑마다 클래스를 추가하는 게 아닌 기본 커피에 객체를 Decorator 클래스에 전달하여 토핑을 추가할 수 있다.
1
2
3
4
5
6
7
8
9
10
11
12
13
14
15
16
17
18
19
20
21
22
23
24
25
26
27
28
29
30
31
32
33

interface Coffee{
  fun cost():Int
}

class BasicCoffee: Coffee{
  override fun cost(): Int {
    return 1000
  }
}

interface Decorator: Coffee{
  val coffee: Coffee
}

class CoffeeDecorator(override val coffee: Coffee): Decorator{
  override fun cost(): Int {
    return coffee.cost()
  }
}

class MilkDecorator(override val coffee: Coffee): Decorator{
  override fun cost(): Int {
    return coffee.cost() + 500
  }
}

class SugarDecorator(override val coffee: Coffee): Decorator{
  override fun cost(): Int {
    return coffee.cost() + 1000
  }
}
1
2
3
4
5
6
7
8
9
10
11
12
13
14

fun main(){
  val coffee = BasicCoffee()
  val milkCoffee = MilkDecorator(coffee) // 기본 커피에 밀크 추가
  val sugarMilkCoffee = SugarDecorator(milkCoffee) // 밀크 커피에 설탕 추가

  println(coffee.cost())
  println(milkCoffee.cost())
  println(sugarMilkCoffee.cost())

}
장단점
장점
- 새로운 클래스를 만들지 않고도 기존 기능을 확장, 조합할 수 있다.
- 컴파일 타임이 아닌 런타임 즉, 동적으로 기능을 조작 할 수 있다.
단점
- 데코레이터를 조합하는 코드가 복잡해질 수 있다.
실제 사례
- Collections.checkedList
기존 List에 타입을 체크하는 기능을 추가하는 checkedList는 데코레이터 패턴을 사용한다.
1
2
3
4
5
6
7
val list = mutableListOf()

list.add(Book("Java"))
val checkedList = Collections.checkedList(list, Book::class) // Book 타입만 추가할 수 있는 리스트
list.add("Kotlin") // ClassCastException 발생
- Collections.unmodifiableList
기존 List에 수정을 막는 기능을 추가하는 unmodifiableList는 데코레이터 패턴을 사용한다.
1
2
3
4
5
6
7

val list = mutableListOf("Java", "Kotlin")

val unmodifiableList = Collections.unmodifiableList(list)

unmodifiableList.add("Python") // UnsupportedOperationException 발생
- HttpServletRequestWrapper : HttpServletRequest를 상속받아 기능을 확장하는 클래스
HttpRequest 해당 요청의 파라미터를 대문자로 변환하는 예제
1
2
3
4
5
6
7
8
9
10
11
12
13

public class MyHttpServletRequestWrapper extends HttpServletRequestWrapper{
  public MyHttpServletRequestWrapper(HttpServletRequest request){
    super(request);
  }

  @Override
  public String getParameter(String name){
    String value = super.getParameter(name);
    return value == null ? null : value.toUpperCase();
  }
}
데코레이터와 어댑터 차이점
둘 다 기존 객체를 감싸는 패턴이 나타나지만, 데코레이터 패턴은 기존 기능을 확장하거나 조합하는 패턴이고, 어댑터 패턴은 서로 다른 인터페이스를 가진 두 클래스를 연결해주는 패턴이다.
Reference
- 코딩으로 학습하는 GoF의 디자인 패턴 - 백기선
